
Subaru Camper: How We Updated Our Forester for Overlanding

Since we first modified our Subaru Forester (nicknamed Forrest) into our dream road trip machine, we’ve absolutely loved the freedom it’s given us to explore. After spending weeks on the road living out of our Subaru camper, we made a few changes to prepare it even more for overlanding. So if you’re looking to get your Subaru 100% adventure-ready, read on for all the details!
Subaru Camper Modifications Round Two: Lighter & Tougher
Rotopax fuel and water containers
Last year we carried extra fuel around in a big, heavy steel jerry can attached to our spare tire holder – which worked great until a screw broke and the whole thing nearly fell off while we were driving around Zion National Park!
Rotopax heavy-duty interlocking plastic containers are an awesome alternative to hauling around awkward jerry cans. We have four two-gallon containers in total – two for gas and two for water (here’s how they work). We attached ours to one arm of our rear tire holder and Aaron picked up a spigot from REI to make our drinking water easily accessible.
I love that I don’t have to carry a giant jug of water around camp anymore, but that they’re also easily removable if we needed to.

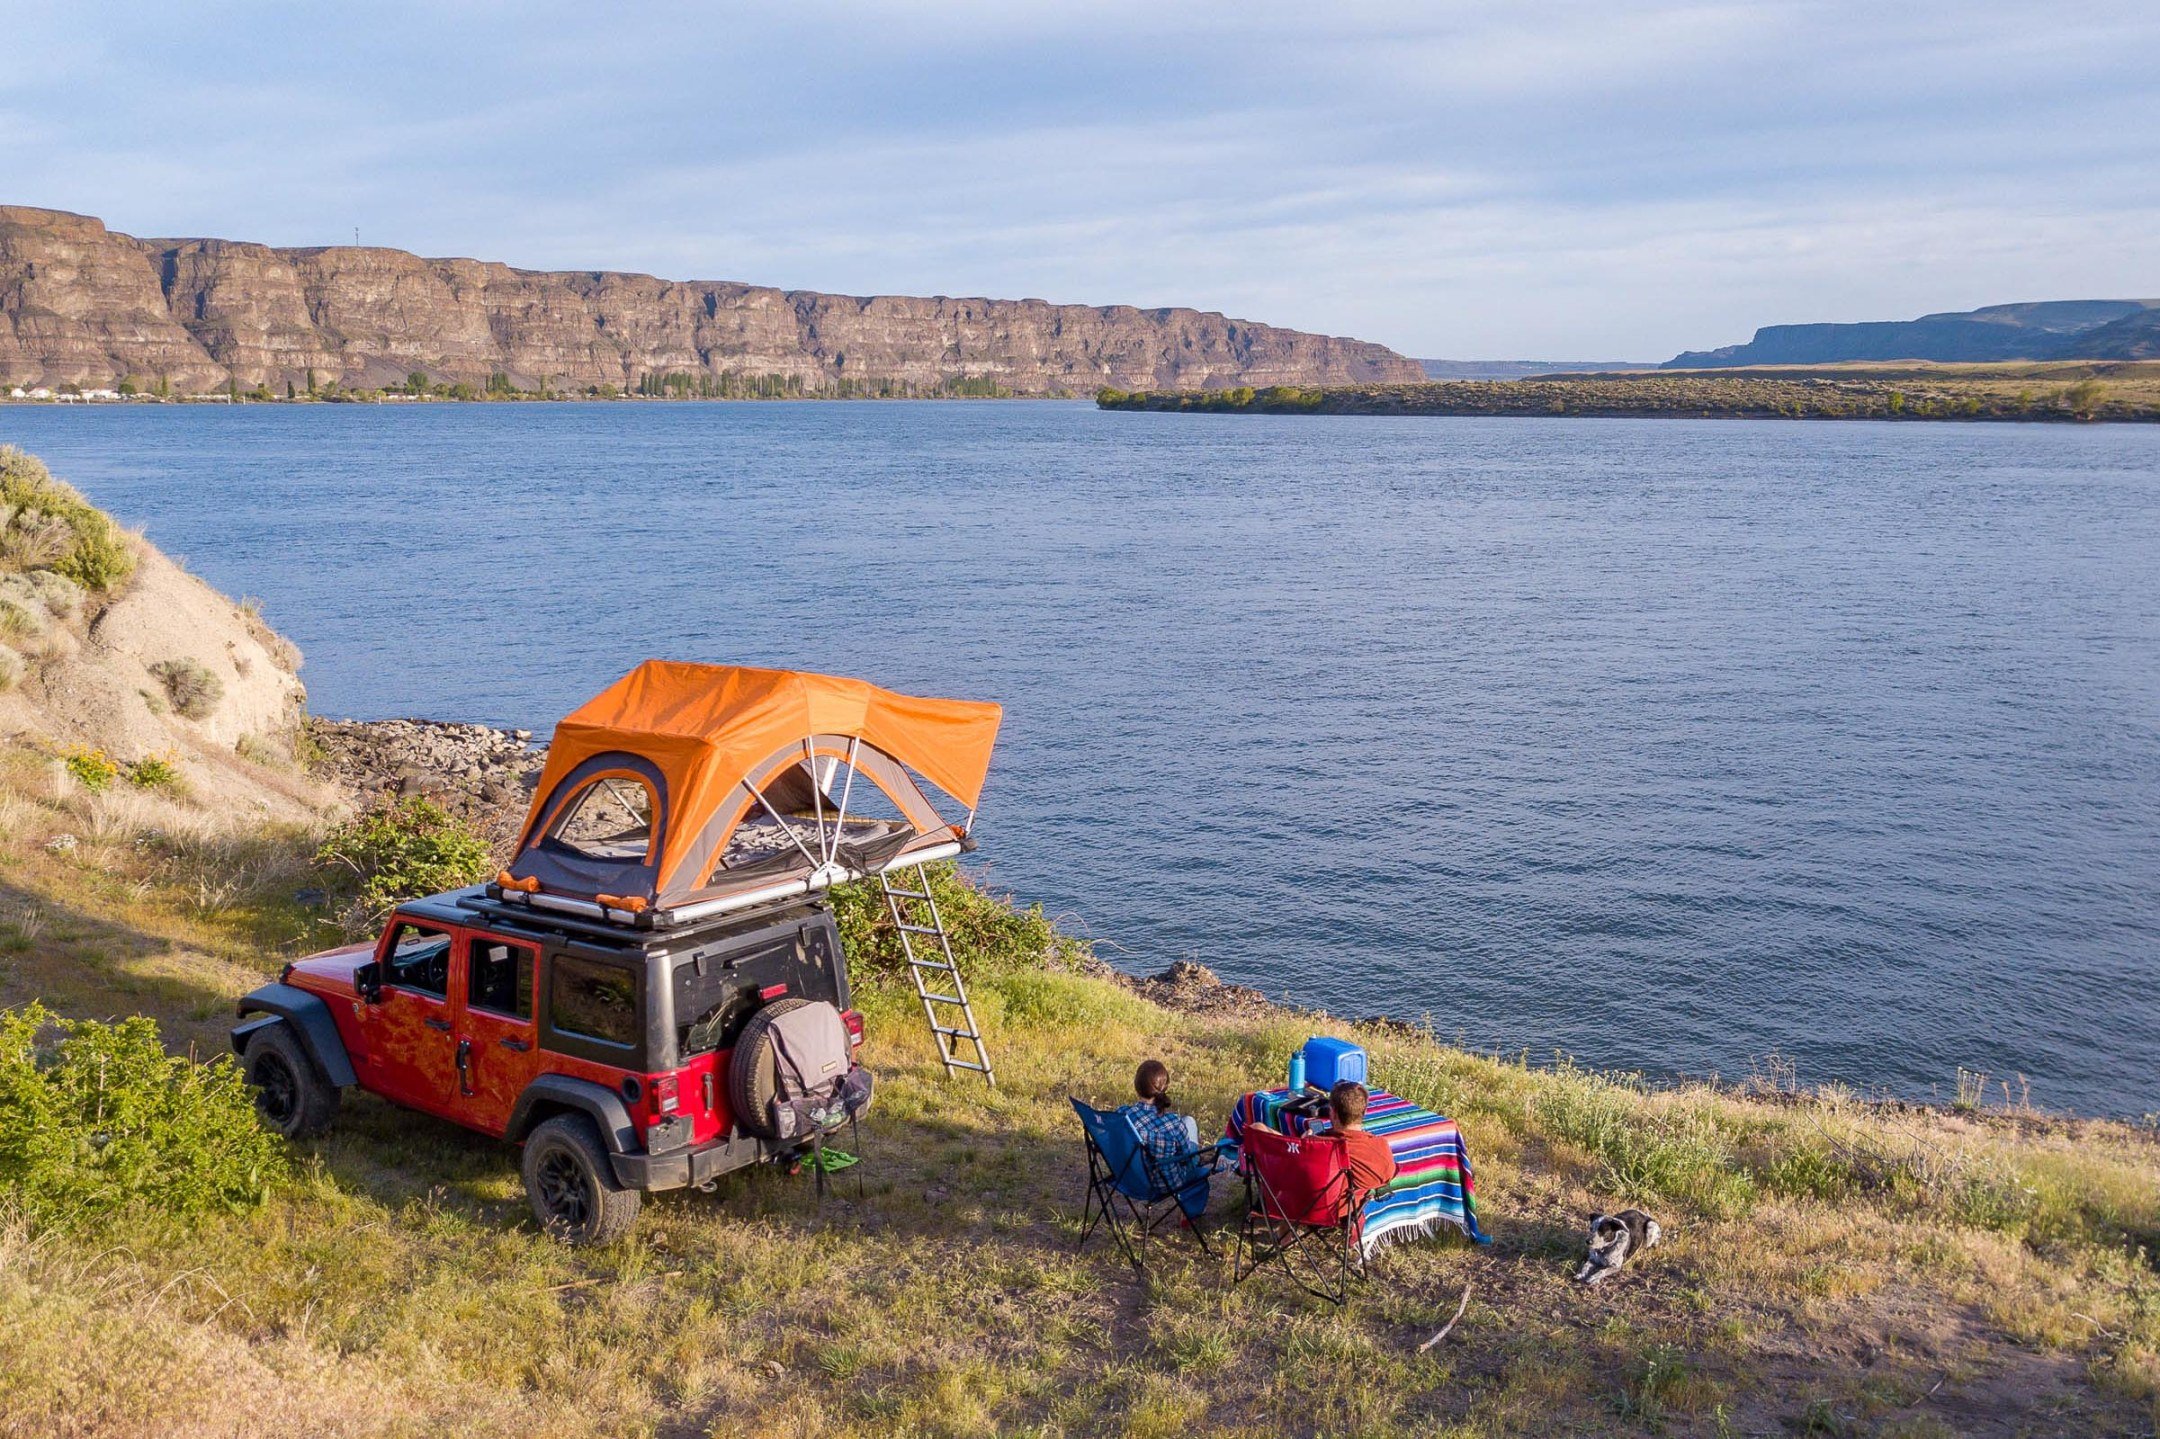
The red and white containers mounted to the back of our Subaru store our water and fuel. Our rooftop tent is from Freespirit Recreation.
Dual-swing spare tire carrier
Our first spare tire carrier was made for us by a friend and served us well for our first year adventuring with our Subaru camper – but we wanted something lighter and more secure going forward. So Aaron welded our own dual-swing spare tire holder himself (because teaching himself to weld is the kind of thing he does for fun).
Aaron’s creation is attached permanently to the car instead of mounted to our trailer hitch like the previous one. We mounted our spare tire on one side and we store water and extra fuel on the other.
If you don’t happen to have welding skills, fabrication shops should be able to whip up something like this for you!

Flip down tailgate table
Here’s one thing we learned from weeks on the road together: We’re low-maintenance about cooking. After long days of driving, hiking, and adventuring, we rarely felt compelled to unfold our full dining table and set up for a fancy meal. When it comes to our kitchen setup, for us less is more.
So we swapped out our 3.5-foot foldable camping table for a drop down tailgate table from Frontrunner. It’s attached to the inside of one of the arms of our spare tire carrier, so it’s tucked away between the tailgate and the spare tire when we’re not using it. When we stop to set up camp, it flips right down and an extra wooden tray slides out from underneath, making the perfect surface for meal prep. We love how much time and space it saves us!

Our super quick and easy kitchen setup
More efficient refrigerator
We did just fine with our electric cooler last year, but we decided to upgrade to an ARB 37-Quart Fridge/Freezer to keep things even colder. Our new fridge uses about one-tenth of the battery power that our previous cooler needed – and since it’s powered by a solar panel attached to our spare car battery, we like to keep things as efficient as possible! It also has a bit more space including the freezer compartment, and it’s super tough.
Could we live without a refrigerator on the road? Sure, but there’s nothing like a cold beer after a long hike on a summer day.
Upgraded secondary battery
One of my favorite upgrades that we originally installed in our Subaru camper is our spare car battery to run the aforementioned fridge and other electronics (read all about it in Step 6 of our original post).
We upgraded that second battery to a group 31 size, which has about 50% more capacity than our previous one. Translation: We can keep our fridge cool for up to two days without turning on the car, or power our glorious heated mattress pad all night for cold-weather camping.
You can get yourself a spare battery at any auto parts store (we got ours at Batteries Plus).

Our spare battery runs a heated mattress pad that keeps us camping in all seasons.
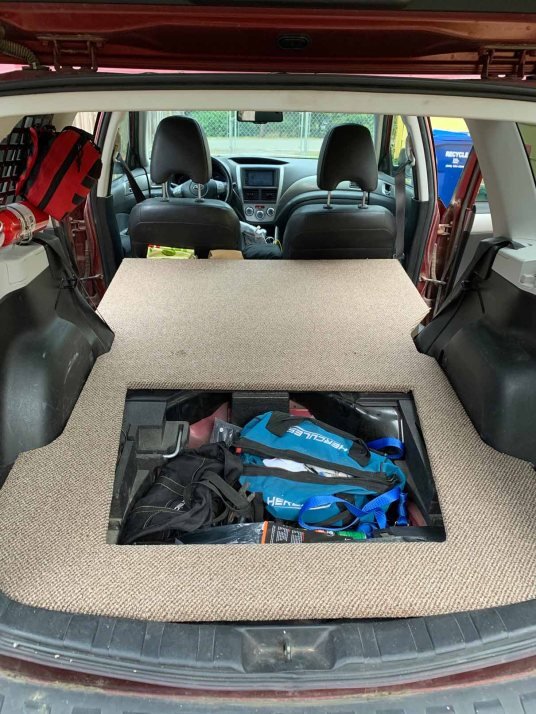
Installed a false floor
If you don’t travel with a dog, you can probably afford to skip this step! Our pup, Jude, spends a lot of time in the backseat of our Subaru so we wanted to make sure she had her own comfortable (and safe) space.
Aaron whipped up a false floor that sits on top of the backseat area (it’s made of half-inch plywood and stain resistant carpet from Home Depot). Instead of balancing our refrigerator on the seats, losing things in the footwells, and making our pup scramble to find herself a comfortable spot, we now have a sturdy, flat platform covering the whole backseat. It’s a great place for Jude’s bed while we’re on the road!

Rebuilt suspension
Many miles on unpaved roads can take a toll on any car. After three weeks overlanding last summer, Aaron noticed some serious wear on our Subaru’s suspension.
Fixing it meant replacing all of the suspension components that could potentially wear out with extra heavy-duty versions. Aaron did this himself (of course), but your auto shop would gladly do it if you’re not mechanically inclined!
Here’s what we’d recommend you (or your mechanic) check before setting out on a big road trip: Ball joints, tie rods, bushings, struts, and brakes. (Honestly, most of that was Greek to me but as long as you have someone available who knows what they’re doing, you’re all set!)
Before hitting the road again, we also upgraded to springs from RalliTek. Our new springs perform better offroad, and they’re stiffer which allows us to safely carry more weight.

Forrest performed like a champ for weeks on roads like this, but needed some TLC when we got home!
Upgraded radio
If you’re planning to log long days overlanding in your Subaru camper, a great radio is a must! We resisted satellite radio for a while, but finally had to admit that there’s no playlist long enough that you won’t get sick of it after weeks on end.
We went with a Pioneer MVH-1400NEX stereo. It comes with Apple CarPlay, which allows us to display and control our iPhones on the car stereo. That means we can navigate and listen to all our music, podcasts and audiobooks directly through the stereo display. It’s pretty cool! (Plus whoever’s driving can glance at Google maps on the dashboard instead of messing with their phone while they drive.)
New wheels and tires
After doing lots of research and putting thousands of miles on our previous set, we decided we needed to upgrade our setup. To make our Subaru more offroad-capable, we swapped out for smaller wheels but larger tires.
Smaller wheels with bigger tires translates to better traction when we’re offroading. It also gives us more ability to air down the tires for driving through sand or rough roads (partially deflating them gives our Subaru a bigger contact patch with the ground).
We swapped out our original 17-inch Subaru wheels for 15-inch KMC KM708s. We paired those with Kumho Road Venture AT51 tires (our tire size is 225/75r15). Our whole setup came from Discount Tire.
Bonus of the new wheels and tires? They’re much lighter and way tougher than what we started with.

If you ask us, the most important upgrade to make to your Subaru camper is a good set of tires and wheels.
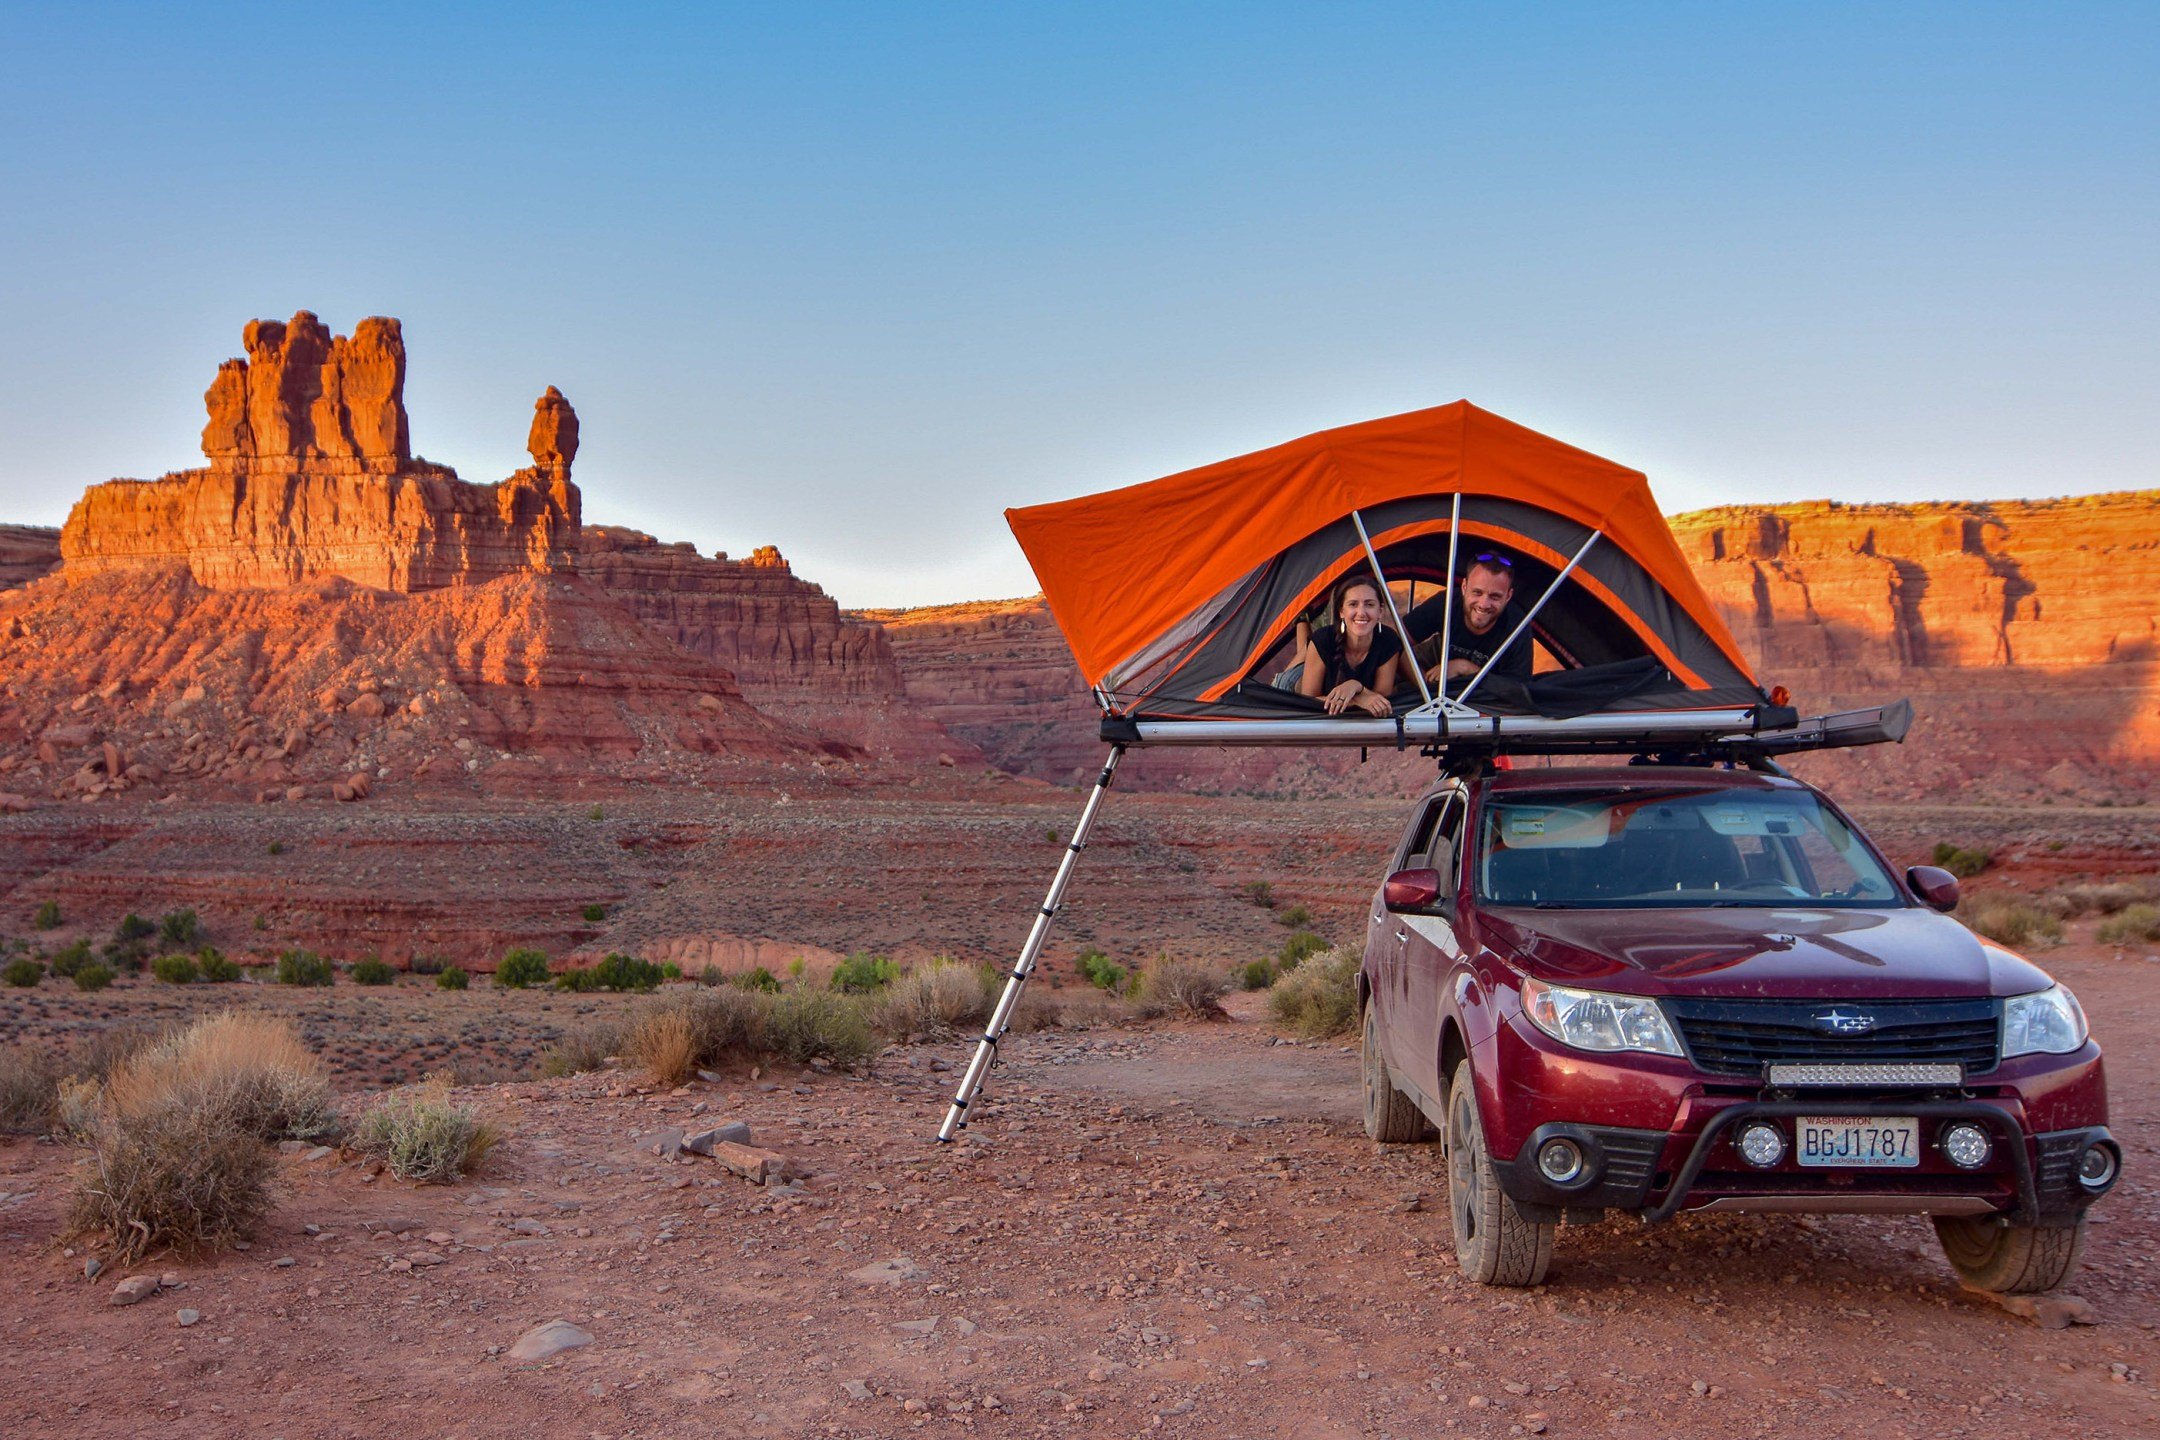
Better roof rack
Our roof rack is what makes our little home on wheels possible. We’d been attaching our rooftop tent and awning to an old, beat-up roof rack we’d had for years and decided it was time for a change!
Our new Yakima JetStream roof rack system has channels running across the top, which means we can bolt pretty much anything we want to the top of the car (we’re talking kayaks, bike racks, cargo carriers, you name it). It’s also super lightweight and tough (are you noticing a theme here?).
Improved aerodynamics & evened weight distribution
Our Forester gets great gas mileage if we’re just driving it to work, but when we’re fully loaded for a long road trip it’s a different story. We definitely felt Forrest struggling a bit on long uphill drives on scorching summer days in Utah! So we did everything we could to cut down the amount of weight we’re hauling and make sure we’re carrying it in the most efficient way possible.
Most of the modifications we mentioned already helped our Subaru get lighter and more streamlined. We also relocated our second battery from the back of the car to the footwell behind the passenger seat (that way the weight of the 100-pound battery is distributed more evenly between all four wheels). We definitely notice that the car sags less in the back now, and it will be easier on our suspension in the long run. We also moved our rooftop tent a few inches forward for the same reason.
If you’re wondering if your car isn’t well balanced, load it up like you would for a big trip and check out the space between each tire and the body of the car. They should be pretty close to even – if they’re not, try to redistribute heavy objects or get cutthroat about what you really need to bring along!
Our new roof rack also helps with aerodynamics – it’s amazing how much of a difference even small changes make. Instead of being round, its bars are shaped more like a wing, which creates less drag on top of being significantly quieter on the road.
We also relocated our recovery boards from the rear of the car, where they had been catching wind and basically acting like a parachute, to the roof. (No idea what I’m talking about when I say “recovery boards”? Read below for details on the safety equipment we carry with us on the road.)
Extra safety gear
The further off the beaten path you’re hoping to get, the more thorough you need to be when it comes to safety. In addition to a basic tool kit, here’s what we travel with to make sure we can get ourselves out of any sticky situations on the road:
Air compressor for airing up a flat or deflated tire
ARB tire repair kit and tire deflator
Tred pro recovery boards (traction mats to help us escape if we get dug into sand, snow, or mud)
TJM snatch strap, also known as a kinetic recovery strap, which helps gently pull a car free if it’s stuck
As we said with our first Subaru camper project, not all of this is absolutely necessary! We highly recommend starting slow and taking your time – it’s not a race, and you might prioritize things differently depending on how you like to travel. Forrest has become a member of the family and we’ve been making these tweaks one at a time over the years we’ve had him.
You don’t have to have the perfect vehicle and the most expensive gear to get out there and have an adventure. And if you’d like help modifying your vehicle for overlanding, get in touch with us.
You Might Also Like:


This post may contain affiliate links. If you make a purchase through our links, we get a small commission at no cost to you. This helps with the cost of keeping this site running – so thank you for clicking through! Don’t worry, we won’t recommend anything we don’t fully believe in.